Good lighting is key to taking great photos. But there’s a find line between bad lighting vs good lighting. What is good lighting? And how can you achieve it in your own photography? In this article, we will explore the differences between bad and good lighting, and give you tips on how to get the best results from your shoots.

8. Bad Lighting Vs Good Lighting: Choosing Light That Does Not Reflect the Mood of Your Image
Light can lend a soft gentle feeling or a fun, exuberant air to a portrait. Sunshine or a cloudy sky will dictate the atmosphere of a landscape.
Choosing the wrong lighting will adversely affect the mood.
Think about the impression you want to create. Once you know, you’ll be able to decide what style of lighting will work best.
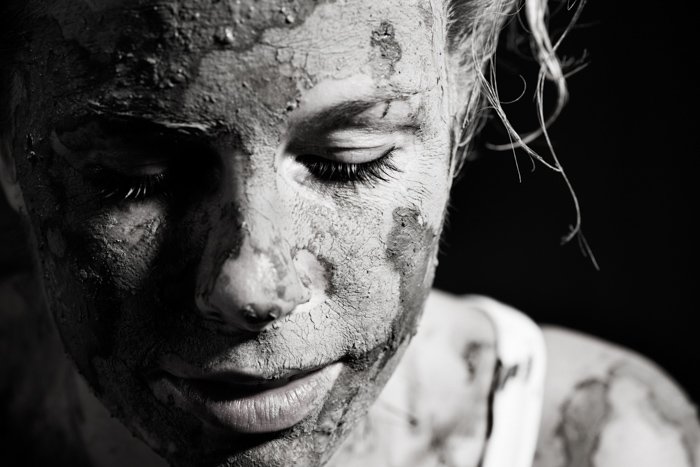
In the two portraits of a ceramic artist below, the main two differences are her expression and the lighting.
Had I swapped the lighting, neither of the portraits would have worked as well.
In the color photo, she exudes joy. The wrap around, soft light enhances this.

The more solemn feel of the black and white portrait is deepened by the dark shadows.
7. Having Distracting Bright Lights in the Background
Backgrounds that divert attention away from the main subject are a common mistake. Often it’s a light source or bright reflection behind the main subject that ruins the picture.
If there’s lighting in the background considerably brighter than your subject, it creates visual conflict. Bright areas at the corners and edges of a frame are most distracting.
Moving slightly to your left or right, up or down, will often remove offending light from your view. Sometimes it may be necessary to move your subject if it’s possible.
Using a longer lens will reduce the amount of background you can see and this is often an effective method also.
I didn’t have time to change lenses when photographing this Hmong girl in the north of Thailand.

The tree behind her made a nice background, but it wasn’t quite wide enough. Light in the top right and on the left side is distracting because of the contrast it creates.
Cropping this photo meant I lost some of my composition, but it makes the image stronger.

6. Light Spill/Shadows in the Background
Positioning your subject too close to the background can create problems with the lighting.
Shadow from your subject is best avoided unless it’s an intended part of your composition. Especially when you are photographing in hard light, a dark shadow will most often be distracting.
Light spilling onto the background is another common mistake. Whether you see your subject’s shadow or not, the light spill can adversely affect background color and tone.
Careful control of lighting, so you have just enough in the background, helps enhance portraits and product photography.
In this portrait, I have a black background with a light pointed at it from behind and one side of my subject.

The key light is not affecting the background. I positioned my model and light to avoid spill.
Had my model and key light been too close to the background a shadow would be visible and the background lighter.
It would have completely altered the mood of this portrait.
5. Full Shade With No Bounce
I love working outdoors with available light. Mostly I prefer photographing portraits in the shade.
This way I am able to avoid dark shadows under people’s eyes, nose, and chin which often happen in bright sunlight.
One mistake when photographing in the shade is to be too deep into the shadows. Having some light bounce into your subject’s face can make them look more vibrant.

Position your subject so they are just inside the shadow, but still close to where the sun is shining. This will provide a little fill light to lift their appearance.
Standing on the train platform, this young man had some light bouncing up into his face. Not enough to make a real difference and the portrait looks rather dull.
The bright background does not help the photo either.

I added a little fill flash to balance with the ambient light.
Popping in this extra light lifts the feeling of the portrait.

Even when the day is overcast it pays to avoid photographing in deep shade, unless you want a really sullen look for your portraits.
Be aware of the light and change your location if you don’t get the look and feel you want.
4. Not Using Hair Light or Using Bad Hair Light
Portrait lighting is often enhanced by including a light on the subject’s hair from behind them.
If you make the mistake of omitting a hair light, the effect it more subtle, but nonetheless important to prevent.
In a studio, it’s relatively easy to add a hair light. Outdoors with natural light, it can be more challenging.
A studio light can be placed to the rear and one side of your subject.
Avoid having the light shining into your camera lens so you don’t get lens flare in your photo. Using a grid or snoot on the light will help with this.

When conditions are right, you can achieve a similar look naturally or use a flash.
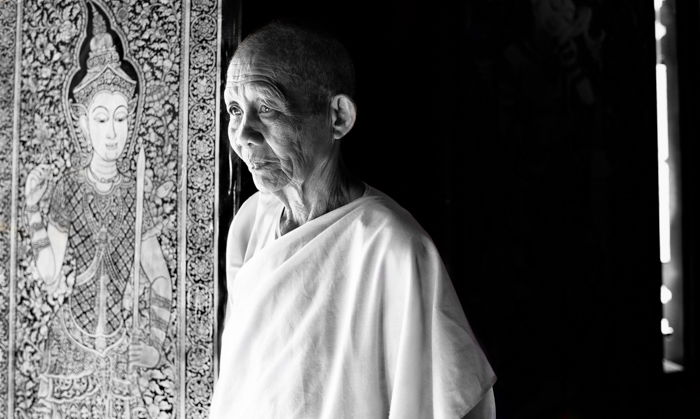
Including a hair light is particularly important if you have a dark background and a dark-haired subject.
I photographed this Karen woman against a black background on an overcast day.
I did not have time to set up lighting and there was naturally no hair light.

On a sunny day it’s easier to create a hair light. I photographed with Karen couple in another village on a sunny day.
Having the sun behind them and filtered has provided a lovely hair light which helps separate them from the black background.

If you’d like to learn more about this technique, please read this article about natural light portraiture.
3. Main Light Is Too High and There’s No Reflector
Making a portrait with the main light too high above your subject is another common photography lighting mistake.
Doing this will result in ugly shadows unless you use a reflector or some other light to fill them in.
Lowering the height of your light, or waiting until the sun is lower in the sky, will help avoid this problem.
Using a fill light or reflector is often easier as you don’t have all day waiting for the sun to go down.
Depending on the mood you have decided for your photo, you may want to place your key light high above your subject.
This is okay, so long as this is intentional and the results provide the lighting look you want.

For this portrait of my friend, we were experimenting to get different, unconventional looks.
My composition is far from standard. The key light is high and off the right, but close to and above my subject. The dark shadows are intentional.
2. Horror Movie Up Lighting
Another problem with key lighting is placing it too low. It’s not as uncommon as placing a key light too high but can result in some scary-looking portraits.
If this is what you are aiming at, a 1960s B grade horror movie style, then place your light low.
If you want to flatter your subject, you need to avoid making this mistake.

In this portrait of a Moken sea gypsy I had an assistant hold a reflector at waist level in front of him.
The overhead sun was too strong and bounced harsh, bright light up onto his face. By adjusting the reflector I achieved a more pleasant light on his face.
1. Using Unbalanced Lighting
Photography lighting mistakes are often caused by imbalanced lighting.
Our cameras have a much more limited ability for ‘seeing’ tone range than our eyes do.
This is changing as camera technology advances, but as of now, our eyes see a much broader range of light and tone than our cameras do.

Balanced lighting does not necessarily mean dull, flat lighting. Work with the available light, add more light or reflection into your composition to achieve the mood you intend.
If you want dark areas with no detail, control them so they are in the shadows.
If you like blown out highlights to create the mood you want, add more light. However you choose to light your photographs, make it work for you.
Creating the right balance is completely your choice.
Technical purists will likely disagree with this approach. Shadows without detail and blown out highlights are forbidden if you go by the book.
Conclusion
Once you have established the mood you wish to portray, you can then light your composition with this in mind. Dark shadows and bright highlights are fine, so long as they are integral to the feel of the photo.
Mistakes will happen. When they do, use them. Learn from them.
Being aware of some common photography lighting mistakes will help you to become more confident as you make them and grow.
For more great photography lighting tips, check out our articles or short and broad lighting, three point or clamshell lighting next!